

Naukri is one of the early bird which started automating mobile applications using Appium.
It took us lot of time to identify compatibility of Appium with Android versions, and then with Selenium versions and further with java and java clients. The challenges we faced and the final compatibility that worked well for us is something I am sharing here. So, just putting it down here for the benefit of any beginner to appium.
Appium! I’m sure is by now not an uncommon tool in the testing community.
I consider that you already know ‘What’ and ‘Why’ about Appium.
One of the major reason we shortlisted Appium here was that it can take care of Android and iOS apps together.
How to automate Android Native application using Appium on Windows?
As said earlier, when we heard of Appium and thought of giving it a shot for automating android application here @ Naukri, we had these questions…
– Which version of Appium?
– Which version of standalone selenium jar
– Which version of client (java-client)
– Which android version devices
– Which versions of SDKs
– Which version of testNG (for reporting and management of framework)
All versions of required tools that we started with to automate here @Naukri are….
| Eclipse (or any other editor) | ||
| SDK | :: | Android SDK Manager (for UI Automator viewer) |
| Appium | :: | v1.3.4.1 (appium updates are also available) |
| Genymotion (for Emulator) | :: | v2.2.2 (optional) |
| Java version (JDK/JRE) | :: | 1.7 |
| Appium Java Client | :: | 2.1 |
| Selenium-server-standalone | :: | 2.42.2 |
Requirements:
- Set System Variable, ANDROID_HOME D:\adt-bundle-windows-x86-20130729\sdk (android sdk path in your system)
- Set System Variable, JAVA_HOME C:\Program Files\Java\jdk1.7.0_25 (jdk path in your system)
- Set System Variable, ANT_HOME C:\apache-ant-1.9.4 (ant path in your system)
- Edit ‘Path’ in System Variable and add the following to it:
- Platform Tools of android sdk %ANDROID_HOME%\platform-tools
- Tools of android sdk %ANDROID_HOME%\tools
- java ‘bin’ path C:\Program Files\Java\jdk1.7.0_25\bin
- ant ‘bin’ path C:\apache-ant-1.9.4\bin
If you have installed all the above and system variables set, your system setup is complete.
Let’s continue further.
Steps to start automating the android application:
- Connect any android device, having android version 4.3 and more [Connected device is detected by adb of your system.]
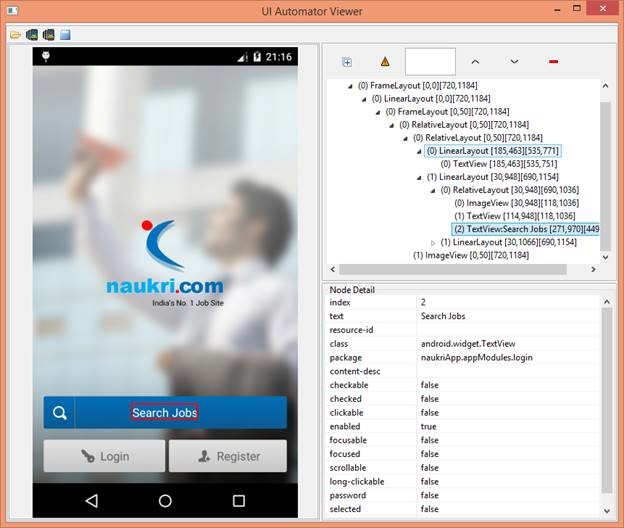
- Navigate to D:\adt-bundle-windows-x86-20130729\sdk\tools double click on ‘uiautomatorviewer.bat’ file to launch UI Automator.
- Click on green phone icon on top left corner of application.
UI Automator viewer displays the layout of your android application, using which you can identify elements.
- Open Eclipse (or your editor)
- Create a new Java project

- Create a new class with name ‘startAppium’ and ‘startAppiumGeneric’

- Add External JARs to your created project.
Steps to External JARs to project are as follows:
- Right-click on project
- Click on option Properties at the bottom
- Click on Java Build Path from left browsing panel
- Click on Libraries tab
- Click on Add External JARs button
- Navigate to the path in your system where all jars are kept
- Choose the following jars:
- java-client-2.1.0.jar
- selenium-server-standalone-2.42.2.jar
- testng-5.5.jar
- Code to start and stop driver and install your android app on connected device in ‘startAppiumGeneric’ class
import io.appium.java_client.android.AndroidDriver;
import io.appium.java_client.remote.MobileCapabilityType;
import java.net.MalformedURLException;
import java.net.URL;
import java.util.concurrent.TimeUnit;
import org.openqa.selenium.remote.DesiredCapabilities;


public class StartAppiumGeneric {

	public AndroidDriver driver;
	public StartAppiumGeneric(AndroidDriver driver){
		this.driver=driver;
	}

	public AndroidDriver StartDriverAndroidApp(String appLocation, String appPackage, String appActivity)  throws MalformedURLException{
	try{Thread.sleep(5000);}catch(Exception e){}

	DesiredCapabilities capabilities = new DesiredCapabilities();
	capabilities.setCapability(MobileCapabilityType.BROWSER_NAME, "");
	capabilities.setCapability(MobileCapabilityType.PLATFORM, "Windows");
	capabilities.setCapability(MobileCapabilityType.PLATFORM_VERSION, "4.3");
	capabilities.setCapability(MobileCapabilityType.PLATFORM_NAME, "Android");
	capabilities.setCapability(MobileCapabilityType.DEVICE_NAME, "Android");
	capabilities.setCapability(MobileCapabilityType.APP, appLocation);
	capabilities.setCapability(MobileCapabilityType.APP_PACKAGE, appPackage);
	capabilities.setCapability(MobileCapabilityType.APP_ACTIVITY, appActivity);

	driver = new AndroidDriver(new URL("http://127.0.0.1:4723/wd/hub"), capabilities);

	System.out.println("========driver after launching app========" + driver );
	driver.manage().timeouts().implicitlyWait(30000, TimeUnit.MILLISECONDS);
	System.out.println("==========complete launchApp========");

	return driver;
}

	public String StopDriver(){
		driver.quit();
		return("----->>> Browser closed");
	}
}
- Code to automate your application in ‘StartAppium’ class
import java.io.File;
import java.net.MalformedURLException;
import org.openqa.selenium.By;
import org.testng.annotations.AfterMethod;
import org.testng.annotations.BeforeMethod;
import org.testng.annotations.Test;
import io.appium.java_client.android.AndroidDriver;


public class StartAppium {

  public AndroidDriver driver;
  StartAppiumGeneric generic = new StartAppiumGeneric(driver);

  public static String appLocation = "";    //path of your .apk in your system
  public static String appPackage = "";    //package name of your app
  public static String appActivity = "";   //activity name of you app

  //xpath of search jobs button on splash screen
  public By searchJobs_Btn = By.xpath("//android.widget.TextView[@text = 'Search Jobs']");

  @BeforeMethod
  public void StartDriver() {
 	try {
		File file = new File(appLocation);
		String appPath = file.getAbsolutePath();
		driver = generic.StartDriverAndroidApp(appPath, appPackage, appActivity);
	} catch (MalformedURLException e) {
		e.printStackTrace();
	}
  }

  @AfterMethod
  public void stopDriver() {
 	generic.StopDriver();
  }

  //Test Case, which will click on Search Jobs button here
  @Test
  public void Click_SearchJobs_Btn() {
 	driver.findElement(searchJobs_Btn).click();
  }
 }
- Start Appium.exe from C:\Appium (appium path in your system)

- Click play button on the right top corner
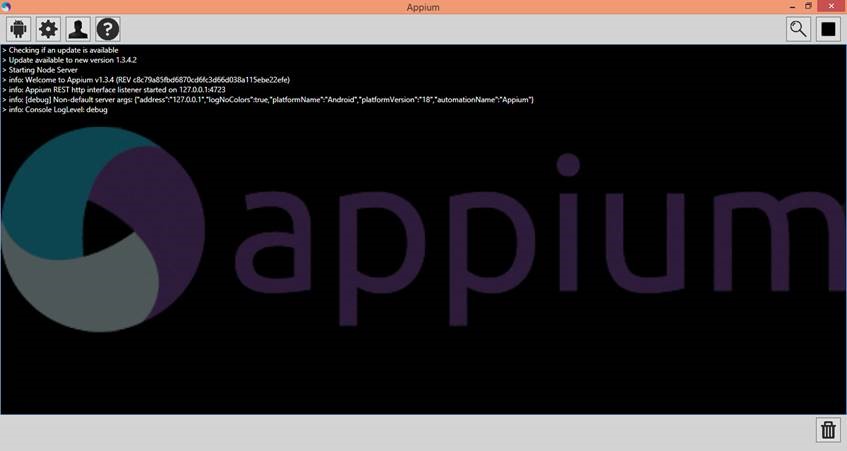
- Right click on test case class ‘StartAppium’ and click Run As –> TestNG Test
Voila! Your test case should start executing on the respective connected device.
It was a long and rocky road, but it surely felt good once we achieved this small milestone. Automating this manual task of testing android application reduced manual effort by around 80%. Releases became faster, issues were identified earlier in development cycle, and play store applications are monitored on daily basis without spending any manual time or effort.
This is how we started and continue automating with appium @ Naukri for Android Applications. I hope this helps you start automating your android app. Do let us know if you have any queries regarding the setup or start.
For more on Appium, Android and automation stay tuned!
[P.S. – All the above mentioned tools have more updated versions available which you can explore]


 The All-New Naukri iOS App (6.0)