

From quite a long time, we have been using selenium grid for parallel testing at Naukri. The purpose of using Selenium Grid is to reduce the total test execution time of an automation suite. This is achieved by running the automated test scripts in parallel on multiple machines. Refer to blog http://engineering.naukri.com/2015/10/parallel-testing-at-naukri/ for more insights on implementation of Selenium Grid for parallel testing at Naukri.
Problem Statement: Although Selenium Grid has helped us in a significant manner over normal execution but every tool implementation comes with some limitations. As we know grid consists of multiple machines in which
- One machine acts as the Hub where automation suite is loaded and
- The other machines act as the Node where test execution will be performed.
So for setting up a grid of 4 Nodes, we used 4 virtual machines at Naukri.

- All scrum teams use this grid setup for running their automation suite before and after the project goes live.
- All the daily live executions of automation suites are done on this VM grid setup.
Having these advantages, following problems arises due to common VM grid setup:
- Individual testers have to wait for executing their suites on VM grid as it is shared across the teams.
- Maintaining the multiple VM’s on daily basis is tedious.
- Testers can run their execution with limited number of threads.
Ways identified to solve the problem:
- Multiple VM grid setups for each scrum: Although this approach provides a separate VM grid to each scrum but it will lead to a high infrastructure costs of buying and maintenance of Virtual machines.
- Docker Grid setup for each individual tester: Using this approach we can provide a 1:1 grid environment setup to individual tester with existing infrastructure.
Docker on the rescue
So after evaluating above approaches, we chose to create a Docker grid, which could be provided to individual testers without any infrastructure cost. Let’s first understand how Docker Grid solved the issues we were facing while using the VM grid:
- Standardization of dependency of Selenium jar and browser version.
- Docker provides the entire grid setup on a single machine, thus saving us from the effort of maintaining the grid on multiple machines or VMs.
- Docker helps in setting up of the disposable grid, which means we can setup and dispose the grid on the fly once the test execution is done.
- Using Docker, we can create any number of nodes on the same host machine.
Implementation of Selenium Grid using Docker
Before understanding the implementation of Docker grid, we should be clear about Docker and its architecture.
- Docker is an open-source project that package an application with all its dependencies into a standardized unit, by automating operating system–level virtualization on Linux.
- Architecture: Unlike VMs, which requires separate OS and libraries for setting up grid, Docker containers share the same OS and are isolated at the same time. Thus less number of resources is required.
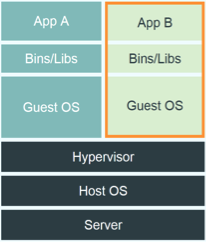
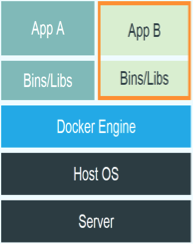
VM Docker
Docker basically works on following components:
- Docker images: Images are used to create Docker containers
- Docker containers: A Docker container holds everything that is needed for an application to run. Each container is created from a Docker image.
- Docker-compose: It is a definition file for multi-container docker set up. It defines how the images will interact with each other.
Docker Grid Setup
Since docker supports only Linux Operating System. Its entire setup needs to be done either on a Linux machine or inside a Linux Virtual Machine.
Although a stable version of “Docker For Windows” is available but it is applicable for Windows10 only. Since in Naukri, QA team uses varied versions of Windows machine (Win7, Win8 or Win10) for testing the applications so we decided to do the docker grid setup on Linux VM using Oracle Virtual box, so that every tester has an individual grid setup on their windows machine for running test suites.
Below flow chart diagram shows the step followed for creating a docker grid setup on linux.

Here is the detailed explanation of the steps followed for setting up a Linux virtual machine on windows machine:
- Enable Virtualization in System BIOS settings: Steps: Go to Advance Options in BIOS—> Device Configuration—>Enable Virtualization—> Save and exit.
- Install Oracle Virtual Box for windows using link: http://www.oracle.com/technetwork/server-storage/virtualbox/downloads/index.html#vbox
- Download Ubuntu server iso file using this link: https://www.ubuntu.com/download/server
- Now install the Ubuntu server VM inside Oracle Virtual Box. For installation steps refer link: https://ilearnstack.com/2013/04/13/setting-ubuntu-vm-in-virtualbox/ Or video: https://www.youtube.com/watch?v=Ykt3MeNwORQ
Once we were done with Linux virtual machine setup on our windows machine, we created the Docker Grid setup on Linux VM in following steps:
- Docker Installation: Install Docker and Docker compose on the Linux machine using the documentation links: https://docs.docker.com/engine/installation/linux/ubuntulinux/, https://docs.docker.com/compose/install/
- Images Creation: Created Docker images to setup a selenium grid. Selenium community has already provided us an open source Docker-selenium project on github. So we downloaded the project from https://github.com/SeleniumHQ/docker-selenium and created the images after making some necessary changes.
As we know Selenium grid works on 2 elements i.e. Hub and Node. So we got 3 final docker images using this project–
- Hub Image
- Node Firefox Image
- Node Chrome Image
Lets understand the procedure of creating the images using the docker-selenium project. We have to create images keeping in mind selenium version and the browser version compatibility, so images are created using following compatibility:
- Selenium-server-standalone-2.47.1.jar with Firefox 30
- Selenium-server-standalone-2.48.2.jar with Firefox 40
- Selenium-server-standalone-2.48.2.jar with Chrome 53 (latest)
As shown in the flow chart, we will create the final images (in green) for selenium: 2.48.2 in following steps: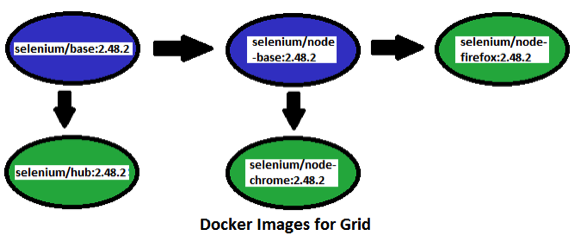
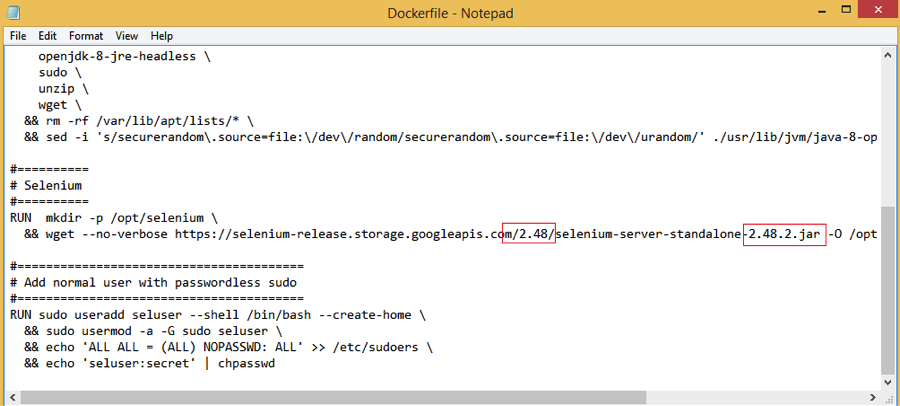
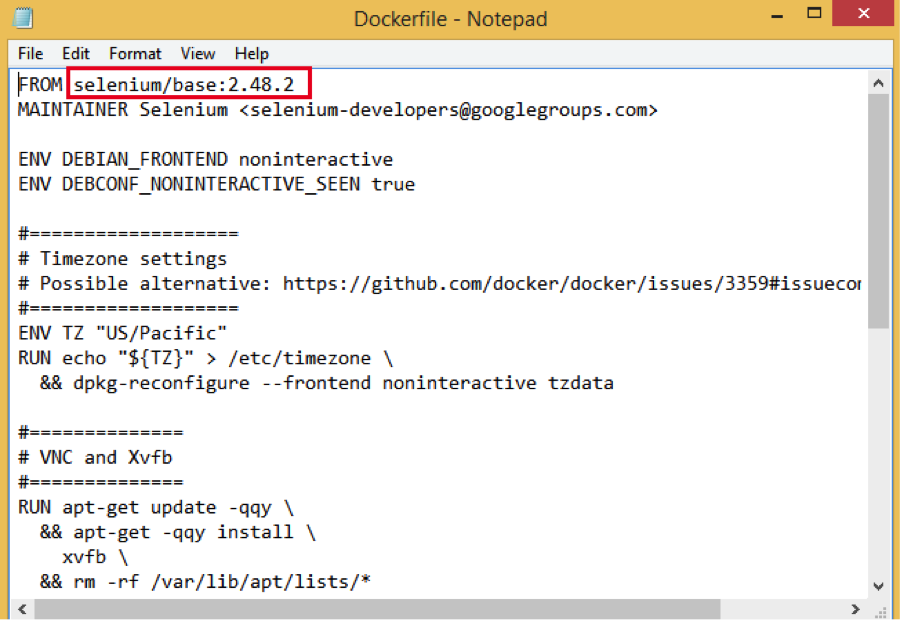
- Selenium/base image: Navigate to “Base” folder in docker-selenium project and open Dockerfile. Change the selenium version to “2.48.2” as shown below and save. Building “selenium/base:2.48.2” image from the dockerfile using command: docker build –t selenium/base:2.48.2 .

- Selenium/node-base image: Navigate to “NodeBase” folder in docker-selenium project and change the selenium version to “2.48.2” as shown below and save Dockerfile. Building selenium/node-base:2.48.2 image as shown:

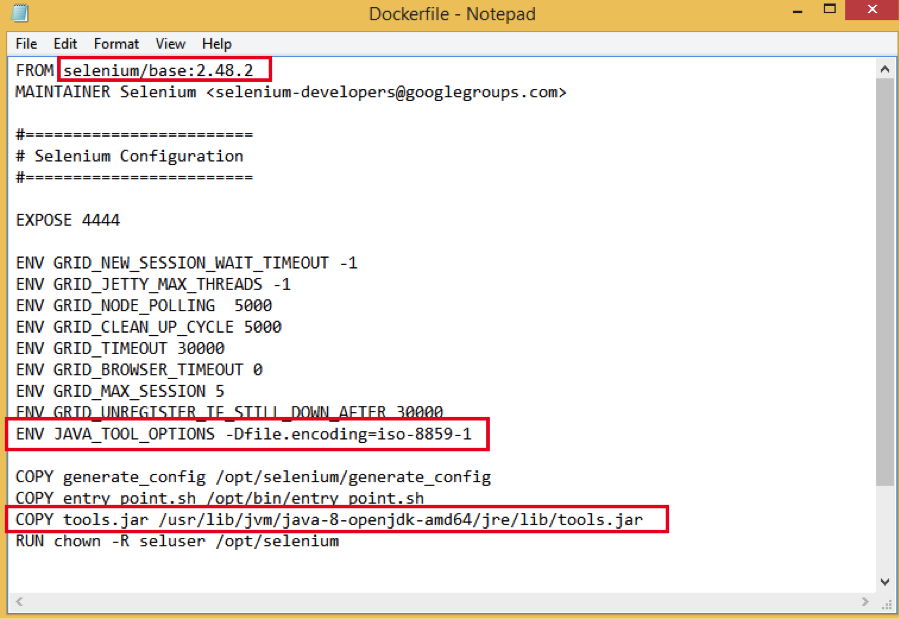
- Selenium/hub image: Navigate to “Hub” folder in the project and make following changes:
- Selenium version to 2.48.2
- Add ENV JAVA_TOOL_OPTIONS -Dfile.encoding=iso-8859-1 – This environment variable is added to avoid any special character errors in the automation project.
- Download tools.jar online and keep it inside Hub folder and add command: COPY tools.jar /usr/lib/jvm/java-8-openjdk-amd64/jre/lib/tools.jar

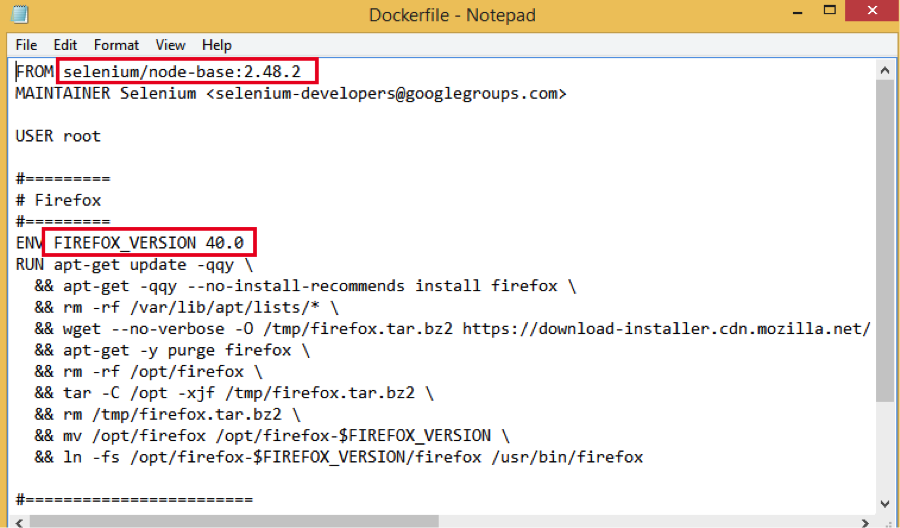
- Selenium/node-firefox image: Navigate to “NodeFirefox” folder and change selenium version to 2.48.2 and Firefox version to 40.0 in dockerfile.

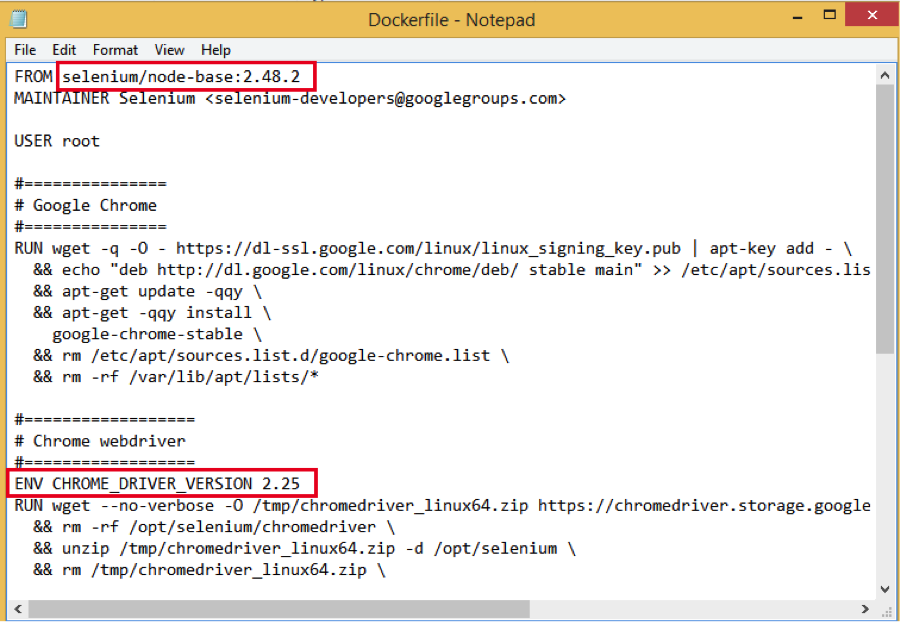
- Selenium/node-chrome image: Navigate to “NodeChrome” folder and change selenium version to 2.48.2 and chromedriver version to 2.25 in Dockerfile. Keep in mind that we cannot add Chrome browser version because chrome only provides the latest version setup. Please check the changelogs for selenium version and latest chrome version compatibility and create a compatible image accordingly.

- Images created with following names:

- Creating Docker-Compose: After creating the final hub and node images, we created a selenium grid setup on our Linux VM by running the hub and node images, which will create separate containers for Hub and Node.
We did this using docker-compose.yml file as it saves manual effort in running the hub and node containers. Docker-compose file looks something like this:
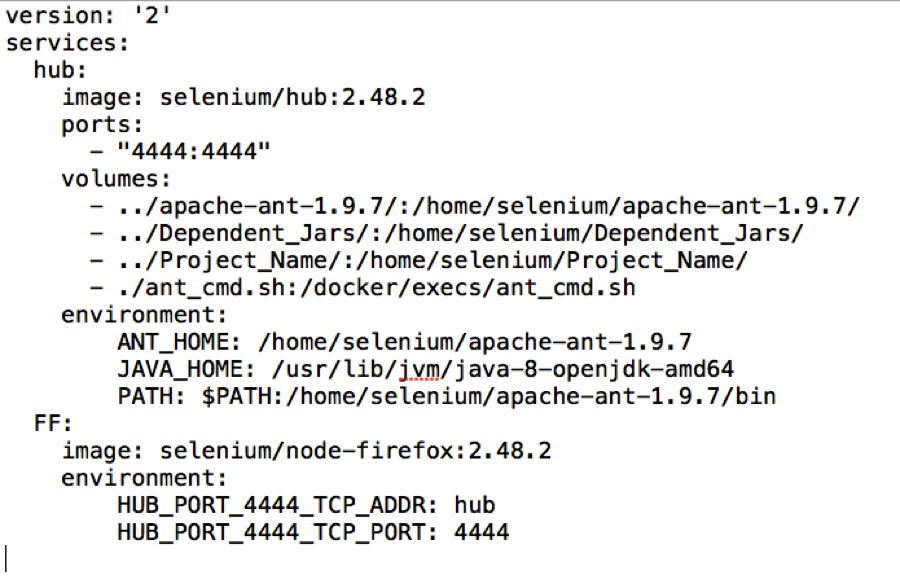
We have defined 2 services here:
- Hub: Inside Hub container we have defined:
- Image: This command will provide the hub image name, which will be used to run the hub container.
- Port: It shows that hub container port is mapped to local host port 4444.
- Volumes: This command is used to mount all the dependent directories inside the hub container.
- Env: We have some project dependent environment variables that also need to be defined inside hub.
2. Node: Inside node we have defined:
- Image: This command will provide the node image name, which will be used to run the hub container. We will provide the name of either firefox or chrome image depending on the browser we want to execute our scripts on.
- Env: 2 environment variables are set to link the nodes with the Hub running on the defined port i.e 4444
We integrated this docker-compose.yml file with our automation project to run it through Ant build tool. We did this in following steps:
a. Since in Naukri, we run our automation suite on both Firefox and chrome browsers alternatively, so we created 2 ymls file for each browser handling i.e
- docker-compose_FF.yml – This file contains the node image for Firefox.
- docker-compose_Chrome.yml – This file contains the node image for Chrome.
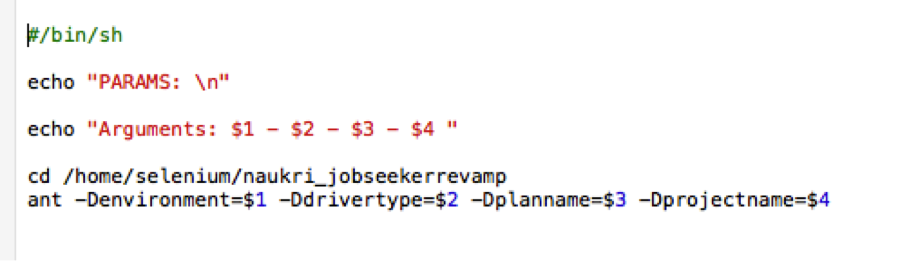
b. Created a script file named ant_cmd.sh, in which the ant command is configured to run the project. Parameters passed through command are naukri framework specific:
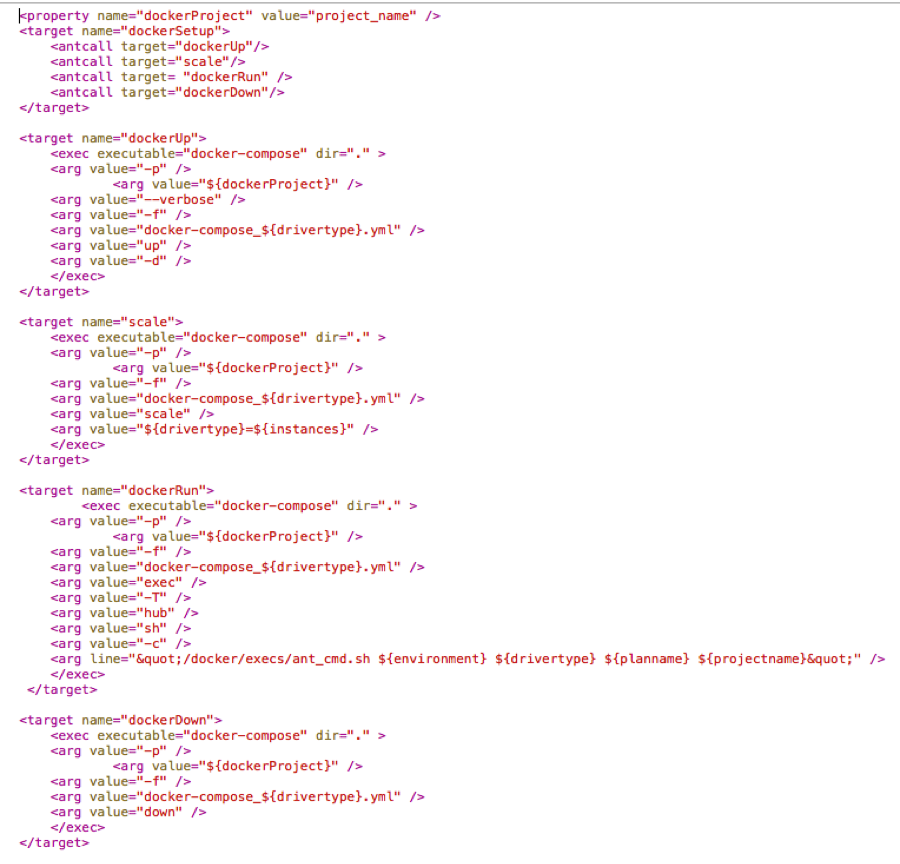
- Changes in build.xml: We created 5 separate targets in build.xml file for running the automation suite through docker grid:
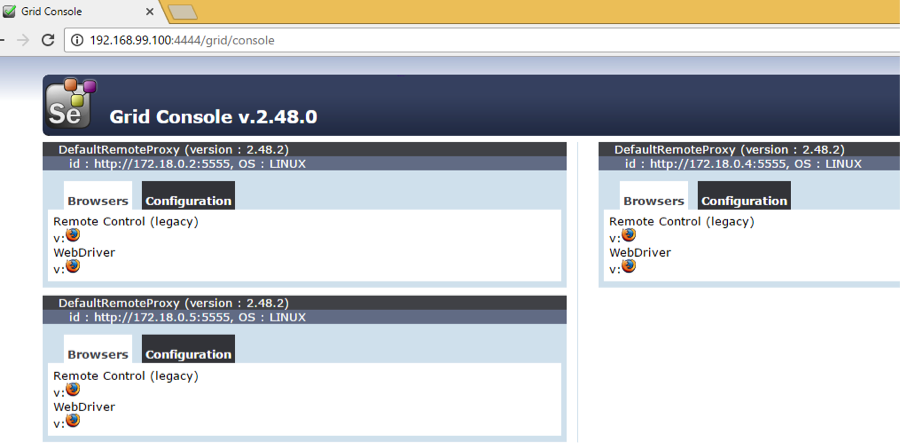
- DockerUp: On running this target, one container for hub and one container for node created to form a selenium grid setup. To check grid console navigate to http://ipaddressOfLinuxMachine:4444/grid/console on your windows browser. Execute command – docker ps to see the running containers:

- Scale: After setting up docker grid, we can scale any number of nodes as per our need. To create a grid of 4 nodes, we will pass a parameter “instances = 3” during runtime which will be used by scale command to create 4 node containers on grid.

- DockerRun: This target is used to run our automation suite on docker selenium grid setup. On running this target, ant_cmd.sh file is executed which contains the ant command to run our automation suite on grid.
- DockerDown: Once the automation suite execution is completed on docker grid, we no longer require the docker grid. So flushed it using dockerDown target. On executing this target, the selenium grid setup will be destroyed.
- DockerSetup: This is the final target which will be executed using below command to execute all the above targets in sequential order:
ant dockerSetup –Denvironment=”liveOrTest” –Ddrivertype=FF –Dplanname=”Plan_Name” –Dprojectname=”Project_Name”
- Final Execution: After making all the changes in the above project, commit the project. Keep all the project dependencies inside a folder named Docker and checkout the project in the same folder. Execution of the project on docker grid is carried out as shown:


Important Findings and Learning’s
Since we are executing test scripts on linux browsers instead of windows, we have some important findings specific to Linux machine and their handling. Sharing the same:
- Although we didn’t change anything in the automation code in order to use Docker for grid but the backward slash (\) used in test data sheets path. Since our scripts are running on Linux inside Docker, so (\) slashes which are supported only on windows need to be replaced with forward slashes (/) which are supported on both windows and Linux.
- On comparing execution results of “Grid on Windows” vs “Grid using Docker”, we found very encouraging results and no deviations are observed till now.
- All the complex web features like Mouse hovering, window switching, file uploads etc. are working fine inside docker grid.
- Since java on Linux does not support special characters encoding (might present in automation code), so we set the java file encoding to iso-8859-1 in the hub image explained previously.
- Currently, we cannot see the browser execution inside docker grid but in naukri we were able to identify the failed cases from browser screenshots.
Conclusion: Docker has proved to be a great way to improve productivity for Naukri by providing the selenium grid setup on the fly on our local testing machines. We are further working on integrating it with Continuous Deployment pipeline for CICD.
Happy Automation!


 The All-New Naukri iOS App (6.0)