

Why we need framework:
- Fast iterative compilation times (up to 3x faster).
- Easy distribution and packaging.
- No modifications to Xcode.
- Simple set-up for third-parties.
- Support for building the framework as a dependent target (i.e. modifying source in the framework and building an app will automatically rebuild the framework and relink as expected).
- Works with the latest version of Xcode.
Constraint to support .framework:
There are a few constraints that we want to satisfy when building a .framework:
- Fast iterative builds when developing the framework. We may have a simple application that has the .framework as a dependency and we want to quickly iterate on development of the .framework.
- Infrequent distribution builds of the .framework.
- Resource distribution should be intuitive and not bloat the application.
- Setup for third-party developers using the .framework should be easy.
I have outlined the solution below which satisfies each of these constraints. I will outline how to build a .framework project from scratch so that you can apply these steps to an existing project if you so desire.
How to go about it:
- Within the project we are going to have three targets: a static library, a bundle, and an aggregate.
- The static library target will build the source into a static library (.a) and specify which headers will be “public”, meaning they will be accessible from the .framework when we distribute it.
- The bundle target will contain all of our resources and will be loadable from the framework.
- The aggregate target will build the static library for i386/armv6/armv7/armv7s, generate the fat framework binary, and also build the bundle. You will run this target when you plan to distribute the .framework.
- When you are working on the framework you will likely have an internal application that links to the framework. This application will link to the static library target as you normally would and copy the .bundle in the copy resources phase. This has the benefit of only building the framework code for the platform you’re actively working on, significantly improving your build times. We’ll do a little bit of work in the framework project to ensure that you can use your framework in your app the same way a third party developer would.
Create the Static Library Target:
Step 1: Create a New “Cocoa Touch Static Library” Project
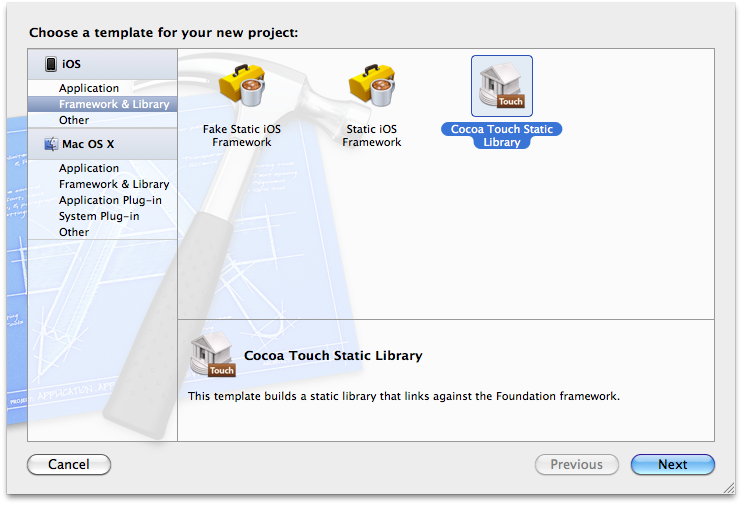
The product name will be the name of your framework. For example, Tracer will generate Tracer.framework once we’ve set up the project.
Step 2: Create the Primary Framework Header
Developers expect to be able to import your framework by importing the <Tracer/Tracer.h> header. Ensure that your project has such a header (if you created a new static library then there should already be a Tracer.h and Tracer.m file; you can delete the .m).
Within this header you are going to import all of the public headers for your framework. Our Tracer.h file would look like this:
#import <Foundation/Foundation.h>
#import <Tracer/Tracer.h>
Once you’ve created your framework header file, you need to make it a “public” header. Public headers are headers that will be copied to the .framework and can be imported by those using your framework. This differs from “project” headers which will not be distributed with the framework. This distinction is what allows you to have a concept of public and private APIs.
You’ll need to select the Static Library target you created (Tracer), open the Build Phases tab:
Add Build Phases from the menu.
Click on Editor > Add Build Phase -> Add Copy Headers Build Phase.
You’ll see 3 sections for Public, Private, and Project headers. To modify the scope of any header, drag and drop the header files between the sections.
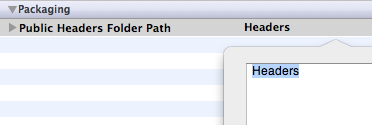
Step 3: Update the Public Headers Location
By default the static library project will copy private and public headers to the same folder: /usr/local/include. To avoid mistakenly copying private headers to our framework we want to ensure that our public headers are copied to a separate directory, e.g. $(PROJECT_NAME)Headers. To change this setting, select the project in the Project Navigator and then click the “Build Settings” tab. Search for “public headers” and then set the “Public Headers Folder Path” to “$(PROJECT_NAME)Headers” for all configurations. If you are working with multiple Frameworks make sure that this folder is unique.
Note:
Whenever you add new source to the framework you must decide whether to expose the .h publicly or not. To modify a header’s scope you will follow the same process as Step 2.
Step 4: Disable Code Stripping
We do not want to strip any code from the library; we leave this up to the application that is linking to the framework. To disable code stripping we must modify the following configuration settings:
“Dead Code Stripping” => No (for all settings)
“Strip Debug Symbols During Copy” => No (for all settings)
“Strip Style” => Non-Global Symbols (for all settings)
By default a header’s scope will be “Project”, meaning it will not be copied to the framework’s public headers.
Step 5: Enable all architecture support
We want our framework able to work with all device architectures. To do so, change this in your project file (not your target files !): “Build Active Architecture Only” => No (for all settings)
Step 6: Prepare the framework for use as a Dependent Target
In order to use the static library as though it were a framework we’re going to generate the basic skeleton of the framework in the static library target. To do this we’ll include a simple post-build script. Add a post-build script by selecting your project in the Project Navigator, selecting the target, and then the “Build Phases” tab.
Select Editor menu > Add Build Phase > Add Run Script Build Phase
Paste the following script in the source portion of the run script build phase. You can rename the phase by clicking the title of the phase (I’ve named it “Prepare Framework”, for example).
prepare_framework.sh
set -e
mkdir -p “${BUILT_PRODUCTS_DIR}/${PRODUCT_NAME}.framework/Versions/A/Headers”
# Link the “Current” version to “A”
/bin/ln -sfh A “${BUILT_PRODUCTS_DIR}/${PRODUCT_NAME}.framework/Versions/Current”
/bin/ln -sfh Versions/Current/Headers
“${BUILT_PRODUCTS_DIR}/${PRODUCT_NAME}.framework/Headers”
/bin/ln -sfh “Versions/Current/${PRODUCT_NAME}” “${BUILT_PRODUCTS_DIR}/${PRODUCT_NAME}.framework/${PRODUCT_NAME}”
# The -a ensures that the headers maintain the source modification date so that we don’t
# constantly cause propagating rebuilds of files that import these headers.
/bin/cp -a “${TARGET_BUILD_DIR}/${PUBLIC_HEADERS_FOLDER_PATH}/” “${BUILT_PRODUCTS_DIR}/${PRODUCT_NAME}.framework/Versions/A/Headers”
This will generate the following folder structure:
— Note: “->” denotes a symbolic link —
Tracer.framework/Headers/ -> Versions/Current/Headers
Tracer -> Versions/Current/Tracer
Versions/
A/
Headers/
Tracer.h
PageLoadTimeModel.h
Current -> A
Try building your project now and look at the build products directory (usually ~/Library/Developer/Xcode/DerivedData/<ProjectName>-<gibberish>/Build/Products/…).
You should see a libTracer.a static library, a Headers folder, and a Tracer.framework folder that contains the basic skeleton of your framework.
Create the Framework Distribution Target
When actively developing the framework we only care to build the platform that we’re testing on. For example, if we’re testing on the iPhone simulator then we only need to build the i386 platform.
This changes when we want to distribute the framework to third-party developers. The third-party developers don’t have the option of rebuilding the framework for each platform, so we must provide what is called a “fat binary” version of the static library that is comprised of the possible platforms. These platforms include: i386, armv6, armv7, and armv7s.
To generate this fat binary we’re going to build the static library target for each platform.
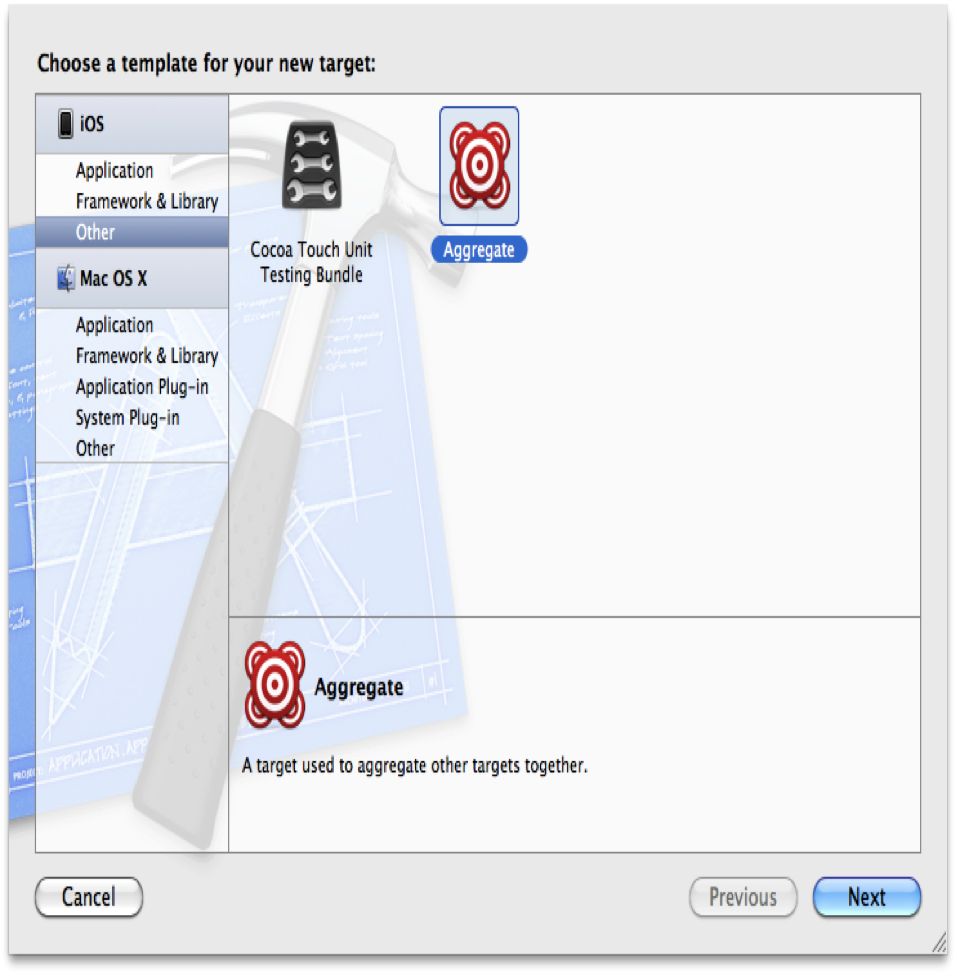
Step 1: Create an Aggregate Target
Click File > New Target > iOS > Other and create a new Aggregate target. Title it something like “Framework”.
Step 2: Add the Static Library as a Dependent Target
Add the static library target to the “Target Dependencies”.
Go to Build Phase> Target Dependencies> Add the libTracer.a as a dependency to the target project.
Step 3: Build the Other Platform
To build the other platform we’re going to use a “Run Script” phase to execute some basic commands. Add a new “Run Script” build phase to your aggregate target and paste the following code into it.
build_framework.sh
set -e
set +u
# Avoid recursively calling this script.
if [[ $SF_MASTER_SCRIPT_RUNNING ]]
then
exit 0
fi
set -u
export SF_MASTER_SCRIPT_RUNNING=1
SF_TARGET_NAME=${PROJECT_NAME}
SF_EXECUTABLE_PATH=”lib${SF_TARGET_NAME}.a”
SF_WRAPPER_NAME=”${SF_TARGET_NAME}.framework”
if [[ “$SDK_NAME” =~ ([A-Za-z]+) ]]
then
SF_SDK_PLATFORM=${BASH_REMATCH[1]}
else
echo “Could not find platform name from SDK_NAME: $SDK_NAME”
exit 1
fi
if [[ “$SDK_NAME” =~ ([0-9]+.*$) ]]
then
SF_SDK_VERSION=${BASH_REMATCH[1]}
else
echo “Could not find sdk version from SDK_NAME: $SDK_NAME”
exit 1
fi
if [[ “$SF_SDK_PLATFORM” = “iphoneos” ]]
then
SF_OTHER_PLATFORM=iphonesimulator
else
SF_OTHER_PLATFORM=iphoneos
fi
if [[ “$BUILT_PRODUCTS_DIR” =~ (.*)$SF_SDK_PLATFORM$ ]]
then
SF_OTHER_BUILT_PRODUCTS_DIR=”${BASH_REMATCH[1]}${SF_OTHER_PLATFORM}”
else
echo “Could not find platform name from build products directory: $BUILT_PRODUCTS_DIR”
exit 1
fi
# Build the other platform.
xcrun xcodebuild -project “${PROJECT_FILE_PATH}” -target “${TARGET_NAME}” -configuration “${CONFIGURATION}” -sdk ${SF_OTHER_PLATFORM}${SF_SDK_VERSION} BUILD_DIR=”${BUILD_DIR}” OBJROOT=”${OBJROOT}” BUILD_ROOT=”${BUILD_ROOT}” SYMROOT=”${SYMROOT}” $ACTION
# Smash the two static libraries into one fat binary and store it in the .framework
xcrun lipo -create “${BUILT_PRODUCTS_DIR}/${SF_EXECUTABLE_PATH}” “${SF_OTHER_BUILT_PRODUCTS_DIR}/${SF_EXECUTABLE_PATH}” -output “${BUILT_PRODUCTS_DIR}/${SF_WRAPPER_NAME}/Versions/A/${SF_TARGET_NAME}”
# Copy the binary to the other architecture folder to have a complete framework in both.
cp -a “${BUILT_PRODUCTS_DIR}/${SF_WRAPPER_NAME}/Versions/A/${SF_TARGET_NAME}” “${SF_OTHER_BUILT_PRODUCTS_DIR}/${SF_WRAPPER_NAME}/Versions/A/${SF_TARGET_NAME}”
Step 4: Build and Verify
You now have everything set up to build a distributable .framework to third-party developers. Try building the Aggregate target. Once it’s done, expand the Products folder in Xcode, right click the static library and click “Show in Finder”. If this doesn’t open Finder to where the static library exists then try opening
~/Library/Developer/Xcode/DerivedData/<project name>/Build/Products/Debug-iphonesimulator/.
Within this folder you will see your .framework folder.
Verify that your framework includes all of the architectures that are available by running the file command on your framework’s static library:
lipo -info Tracer.framework/Tracer
You should see output resembling:
Architectures in the fat file: Tracer.framework/Tracer are: i386 x86_64 armv7 armv7s arm64
If you don’t see all of the architectures listed, make sure that you’re looking at the right framework output. If you’re building with the Simulator as your target, the correct framework will be in the -iphonesimulator folder. Sometimes it can help to delete the Debug- and Release- folders to ensure that you’re getting a truly clean build.
Once you’ve verified that the framework includes all of the architectures, you can now move the .framework elsewhere, zip it up, upload it, and distribute it to your third-party developers.


 The All-New Naukri iOS App (6.0)